Search
Categories
Have a request?
  • Don't be shy!

    Is there something you'd like to see more of or a specific recipe you'd like us to make? Or do you have a question related to food or cooking? Even if you just want to say hello and introduce yourself, feel free to use the form below!
  • Your Name *
  • Your Email *
  • Subject *
  • Message *


Entries in snack (80)

Friday
Jun032011

Green Onion and Cheddar Soda Bread... Is the Mayhem Really Over?

June…hem?  Just doesn’t have the same ring, does it?  Well, May might be over, but things will continue to be a bit shaken up around here.  I will continue to be homeless for probably at least another two weeks.  Not a lot of gourmet cooking going on in a hotel, even if it does have a kitchen.  So, to help me out, Seeley and I will be switching our post dates next week.  She’ll be posting on Friday the 10th, and I’ll be posting on Tuesday the 14th. 

In more exciting news, we have a fabulous guest who will be posting on Friday, June 17th.  Gemma Halliday will be paying us a visit to celebrate her latest release, Hollywood Confessions.  Yes, I mean THAT Gemma Halliday!  How awesome is that?  She’ll be sharing a recipe and cooking story with us, so stick around for the fun.  In the meantime, You can check her out here

Ok, that ends the news portion of this post, we now return to your regularly scheduled programming.  Green onion and cheddar soda bread.  Ever prepare a meal that could really use a slice of bread or a roll, but you don’t have the time or energy for making yeast bread?  Soda bread to the rescue.  It’s quick, easy, and delicious.  Add green onions and extra sharp cheddar to the mix, and it’s even more fabulous.  So, let’s get started on it. 


Here’s what you’ll need:

2 ½ cups flour
2 teaspoons baking powder
1 teaspoon baking soda
½ teaspoon salt
4 tablespoons cold butter, cubed
8 ounces extra sharp cheddar
½ green onion, thinly sliced
1 ¼ cups buttermilk
1 large egg


In a mixing bowl, sift or whisk together all the dry ingredients.  Cut your butter into small cubes and throw them into the flour. 

Mix on medium-low speed until it looks a bit like this:

If you don’t have a stand mixer, feel free to use pastry blender, two knives, or even your fingers.  Throw in the cheese and green onions.  As you can see, I used a very large grater for the cheese.  Regular graters are fine, or you can cut very small cubes.  Either way, mix it into the flour mixture until evenly distributed.   

Measure your buttermilk and then crack in the egg. 

Oops, I forgot about the pan.  Butter the bottom and sides of a square glass pan, and preheat your oven to 375°. 

Now, mix together the egg and buttermilk and pour them over the dry ingredients. 

Mix just until it comes together into a sticky mess, er… mass.

Scrape it from the bowl and plop it into your prepared pan. 

Wet your fingers and press it evenly into the pan.

Into the oven for 40 – 45 minutes.  The top will be a beautiful golden brown and a toothpick inserted in the center will come out clean. 

Allow it to cool in the pan for 5 minutes and then turn out onto a cooling rack.  Allow it to sit for at least another 20 minutes before you give into the temptation to cut yourself a big hunk.  It’ll help it stay together when you do cut it. 

Enjoy with butter or as a side for chili or any dinner.  Or simply nibble on it just the way it is. 

Stay tuned for more details about Gemma’s upcoming visit!   

Friday
May062011

Strawberry Lemonade Bars - The Mayhem continues!!

In keeping with the mayhem theme for this month, I thought I’d try something I’ve never made before, and rather than using a recipe, I’d just wing it.  Fortunately, things worked out in my favor this time. 

Ok, so perhaps strawberry lemonade bars are more fitting for a midsummer’s day, but I’m anxious for spring to start.  The sun finally came out here in Utah, and with Mother’s Day this weekend and the snow hopefully gone for good, I wanted to make something fresh, fruity, and fun.  What’s better than the refreshing tang of strawberry lemonade?  The sweet tart flavor of strawberry lemonade combined with chewy edges, a smooth, creamy center, and a tender, flaky crust.  That’s what. 

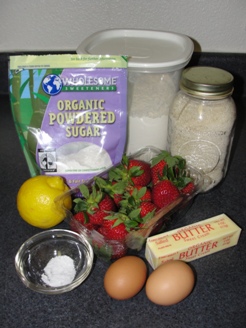
I know you’re drooling for them already, so let’s get started. 

For the crust:
½ cup butter, cold
1 cup flour
¼ cup powdered sugar
¼ teaspoon salt

For the filling:
2 eggs
1 teaspoon lemon zest
3 Tablespoons lemon juice
1 cup sugar
¼ teaspoon salt

Strawberry puree:
3 or 4 strawberries
1 Tablespoon sugar
1 Tablespoon lemon mixture

Before we get started, line a 9x9 pan with parchment and preheat your oven to 350°.  Then, in a mixing bowl, sift together the flour, powdered sugar, and salt.  Cut your butter into small cubes and toss them into the flour. 

If you don’t have a stand mixer, you can definitely do this with a pastry blender, or even your fingers.  If you’re lazy, like me, just turn the mixer on low and slowly increase the speed to medium.  Mix for about a minute or so until the mixture becomes crumbly, then dump it into your prepared pan. 

Press the mixture firmly into the bottom of the pan with your palm, or something flat like the bottom of a glass.  Bake for 20 minutes. 

While that’s baking, we’ll start on the filling.  Basically, just throw all the filling ingredients into a bowl and whisk them until they’re thoroughly combined.  Be sure to squeeze your own lemon juice.  The bottled stuff won’t cut the mustard here.  

Leave the whisk in the bowl.  You’re going to want to stir it again just before pouring it into the crust.

Now for the strawberry puree.  Wash and hull your strawberries, then throw them into your blender with the other ingredients. 

Blend on medium speed until it’s fairly smooth.  You want to keep the seeds intact, and a bit of texture is fine.  Pour the mixture into a plastic bag. 

When the crust has finished its 20 minutes in the oven, pull it out.  Stir the lemon mixture and pour it over the hot crust.  Snip one of the corners off of your bag. 

Cut a smaller amount than I did.  My strawberry mixture got a little out of control.  (Mayhem!!)

Ideally, you’d want twice as many passes as I got, with half the width in each, but oh well.

Drag a toothpick vertically through the mixture, alternating directions. 

When you’ve gone all the way across the pan, it should look something like this:

Place the pan back in the oven for another 25 minutes or so.  It’ll still jiggle a bit in the center, but be set enough that it doesn’t run.  Cool to room temperature and then refrigerate for 2 hours or so before cutting.  This is the reason I like using parchment.  When the bars are cold, you can run a knife along the pan edges and then pull the whole block out of the pan.  So much easier to cut.  Cut into squares and sprinkle with powdered sugar. 

The strawberry puree becomes slightly chewy adding to the lovely array of flavors and textures.             


As Seeley mentioned in her last post, things are probably going to be a bit crazy around here this month.  With my frequent bouts of panic (OMG!  In 13 days I'm moving all the way across the country to a place I've never even visited and leaving everything I know, and own, behind!!)  [see, there goes another one] and her, well... distractions, don't be surprised to see a fair number of mistakes and mishaps.  It's May(hem!!!)!