Search
Categories
Have a request?
  • Don't be shy!

    Is there something you'd like to see more of or a specific recipe you'd like us to make? Or do you have a question related to food or cooking? Even if you just want to say hello and introduce yourself, feel free to use the form below!
  • Your Name *
  • Your Email *
  • Subject *
  • Message *


Entries in holiday (51)

Wednesday
Dec042013

Gourmet Hot Chocolate Balls

First, I must apologize for my recent blog neglect.  It isn’t for lack of trying, really.  It’s just that… well… see what you probably don’t realize is that between all the beautiful stuff that gets posted here, there are plenty of failures.  Unfortunately, I’ve had more than my share of those lately, hence the lack of posts.  I’m back, though, with a fabulous holiday treat!

Here’s what you’ll need: 

  • 1 cup heavy cream
  • 2 cups chocolate chips
  • Cocoa and various other things for rolling in, which I will explain later 

First up, pour your chocolate chips into a bowl and set it aside.  Next, heat your cream just barely to a simmer.  I actually did it in the microwave this time, but if you do that, be careful, and be sure to stir every 30 seconds or so.  You don’t want it to boil.  Pour the hot cream over the chocolate. 

Cover and let it sit for 3 minutes.  

When you uncover it, it won’t look much different, but trust me, it’s ready. 

Gently whisk until it becomes shiny and perfectly smooth.  (Unfortunately I didn’t get a picture of that this time around so I’m borrowing this one from when I made actual truffles.)

Put that into the fridge until its nice and firm, which will probably take an hour or two.  When it’s ready, begin scooping out lumps that are roughly 2 Tablespoons in volume.  (If you have a little ice cream style scoop, it would be perfect for this job.  Unfortunately, I don’t have one.  Why don’t I have one?  I might just have to pop on over to Amazon and remedy that.)

Shape it into something resembling a ball and place it onto a piece of parchment. 

Repeat until you’ve gotten through all the ganache.  (That’s what the chocolate/cream mixture is called.)  You should be able to get about 12 of them.  I know, there are only 10 in my picture.  One is missing because it was used as a sample.  I figure there is probably another one because my balls were getting bigger and bigger as I went.  If you’re more consistent than me, you should be able to get 12. 

Now comes the fun part.  This is where you can flavor them with all different kinds of stuff.  Let’s just start with cocoa, and then I’ll give you a list of other things to try.  Sift some cocoa into a small bowl. 

Then drop one of your balls into it.

Roll it around until it’s completely coated.  Shake of the excess and place it onto a foil lined sheet pan.  (Parchment would also be fine, but you don’t need the nonstick for this purpose and foil is usually cheaper.)

Ok, so now for the ideas I promised.  I coated some of mine in cocoa, some in vanilla sugar, and some in crushed peppermint candies, because that’s how I roll.  (Ha!  See what I did there?  It’s funny because I was rolling the… oh never mind.)

Anyway, those are just a few ideas.  You could use orange sugar or you could even mix a little salt with the sugar (chocolate and salt are so yummy together!)  For a Mexican style hot chocolate, you could mix cinnamon with the cocoa powder, or if you want a little kick, stir in a pinch of cayenne.  The possibilities are endless, and the cool part is, they can all be different.  If you’re having guests over, they’ll have their pick of flavors to choose from, and everyone will be happy. 

So far, all we have are truffles, but when you’re ready, you can transform them into fabulous, gourmet hot chocolate in a trice.  Each truffle will be good for about ¾ cup of milk.  Just drop one of them into the bottom of your mug. 

Then heat the milk until it’s nice and steamy and pour it over the top. 

Allow it to sit for 2 minutes or so, then just stir.  If you have any trouble with little bits of ganache settling on the bottom, just grab a little whisk.  And there you have it.  Serious hot chocolate goodness.  I topped mine with whipped cream because duh, it’s hot chocolate. 

What is your favorite flavor of hot chocolate? 


Friday
Nov222013

Sweet Potato Crisp

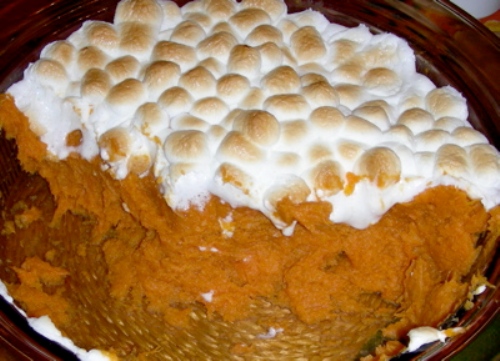
One last Thanksgiving side before the big day next week.  By now you probably have everything all planned out.  You might have even done your grocery shopping already.  If your Thanksgiving spread is going to include something that looks like this…

You might want to call an audible.  You know, I grew up eating ‘yams’ just like that, and quite honestly, loved them.  Of course, I loved happy meals too, and I wouldn’t touch one of those with a ten foot pole these days.  Some traditions really are just for children.  And while we’re on the subject of traditions and ‘yams’, let me set the record straight, once and for all.  This is a yam. 

The things you buy in the can or in the produce department are not yams.  Not the orange ones, and not the white ones.  They are all sweet potatoes.  Yam is a misnomer that just happened to catch on in America.  See if you can convince at least one person this holiday season to stop calling them yams.  It will make me feel just a little bit better.  Ok, so enough about my sweet potato pet peeve, let’s get this show on the road. 

Here’s what you’ll need:

For the sweet potatoes:

4 medium sized sweet potatoes
1 cup half and half
2 eggs
¼ cup sugar
Pinch of salt

For the topping:

½ cup butter, softened
⅔ cups oats
⅔ cups whole wheat flour
⅓ cup brown sugar
⅓ cup sugar
1 teaspoon vanilla
1 teaspoon cinnamon
½ teaspoon nutmeg
½ teaspoon salt
½ teaspoon baking powder

Preheat your oven to 375°.  Wash your sweet potatoes very well and dry them.  I’ll be honest, the white sweet potatoes are better than the orange ones, but my store didn’t have any.  I know ‘better’ is in the taste buds of the feaster, as it were, but that is not the case this time.  White sweet potatoes are better.  Trust me.  Regardless of that, the orange ones are still very tasty and will work if your store has as limited selection as mine did.  Ok, back to cooking.  Place the sweet potatoes onto a foil lined sheet pan.  (This is a small sheet pan, not giant sweet potatoes.)

Pop them into the oven and set the timer for 60 minutes.  With sweet potatoes, you can really smell when they’re done, because they begin to ooze and the liquid caramelizes.  This is why I line the pan with foil.

To be sure, you can check for doneness by inserting a fork. 

If, once through the skin, it goes in and out easily, it’s done.  Mine took 90 minutes, so don’t be surprised if they’re not ready yet.  Another method for checking is just to squeeze them.  They should give easily under your fingers.

Make sure you use a hot pad, though.  They’re really hot.  Once they’ve finished cooking give them a while to cool.  They can happily sit on top of the stove for a few hours, but you can start peeling them whenever they’re cool enough to handle.  The skin will come off fairly easily with a knife. 

When the peel is removed, just cut them into large chunks.  You can do it straight into the mixing bowl you’re going to use, but I decided this was a good stopping point, so I just covered this bowl and put them in the fridge overnight. 

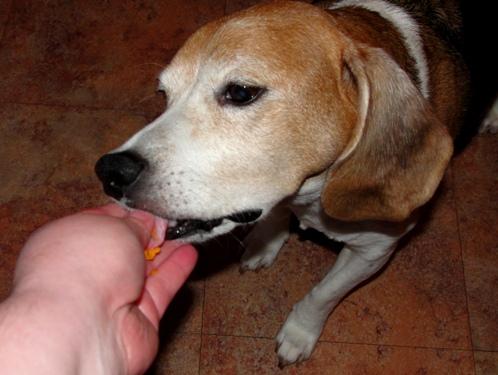
Then, I shared a few bites with Otto because he’d been smelling them for hours, and sweet potatoes are his most favoritest snack.

When you’re ready, throw the sweet potato chunks into your mixing bowl along with 2 eggs, 1 cup of half and half, ¼ cup of sugar, and a pinch of salt. 

Now, I really enjoy the flavor of sweet potatoes (especially the white ones) just the way they are, so I don’t want to do much to them.  If you want them sweeter, add more sugar.  Now just turn on the mixer.  You could also do this with just a potato masher, but I prefer my mixer to do the labor work in my kitchen.  The mixture won’t be completely smooth, but that’s fine.

Pour the mixture into a buttered 8x8 pan and wash your bowl and beater so you can make the topping.  It really couldn’t be simpler.  Throw that whole list of ingredients into your mixing bowl. 

Yes, I know I didn’t sift anything, I didn’t incorporate the baking soda with the flour, all the ingredients are in their own little piles, and I just threw the stick of butter in whole.  Trust me, the mixer will take care of everything.  Just turn it on, starting on low and slowly increase the speed to medium.  Allow it to run for a minute or so, until the mixture is looks moist and crumbly. 

You can also accomplish this with a pastry blender, or even a fork, but well… see above.  Now pour the topping over the sweet potatoes. 

I know, you’re thinking right about now that this is way too much topping.  Personally, I don’t think too much topping is possible when it comes to crisp.  Just pile it on and spread it around.  I promise no one will complain. 

Just in case, you’ll probably want to put the pan on a sheet pan, then slide it into a preheated (oops, forgot to mention that part) 375° oven (Well, 1 for 2 isn't bad, right?).  Bake it for 45 minutes.  It should be nice and brown on top when it’s ready. 

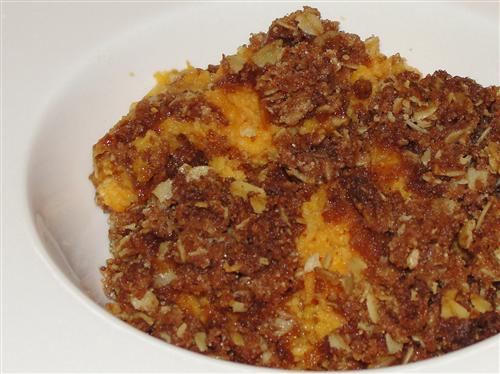
Now, this is difficult, but it is important to allow any kind of crisp to set for at least 20 minutes before digging in.  I know it’s like torture, but you’ll be glad you did.  Your Thanksgiving guests will love your new sweet potato dish.  Or, if you’re just having a craving for sweet potatoes, like I was, you can just scoop some into a bowl and call it lunch. 

What?  I don’t see a problem with having sweet potatoes for lunch.  It’s a serving of vegetables, right? 

What is your favorite thing to do with sweet potatoes?   


Page 1 ... 7 8 9 10 11 ... 26 Next 2 Entries »